Showing posts with label DIY. Show all posts

Jul 24, 2017

The Ultimate Homemade Deodorant List


Hello, my name is Katy and I have a deodorant addiction. When I was in high school I would regularly apply deodorant.

Get up in the morning and get ready for school? Apply deodorant. About to leave the house to go see some friends after school? Apply deodorant. Just finish swim practice to go home for the night? Apply deodorant.

I'm not really sure whether it was the fear of  smell or the sweat that motivated my need to apply deodorant several times through the day. I have gotten better about only needing to apply deodorant once a day, so that's good. However I still apply more than some people. I had a girlfriend who would apply a single swipe. That would never do. I must swipe at 3 times just to make sure I cover the entire area.

So all of this is leading to my confession: I still use conventional deodorant. My extensive history with deodorant means that I am needing a little more courage to swap to a homemade or plastic free alternative. If I had to place where I am on the scale of being ready to quit plastic deodorant I'd say I'm in the contemplation stage. You can read more about the stages of quitting here

So I reached out to some of my favorite bloggers to see what their favorite deodorant recipes are. I thought having this list might be that oomph I need to make the change.


Not quite there yet with making your own? 

Here are some alternatives that you can buy. These are affiliate links so the price to you is the same, but if you make a purchase I may make a commission.

Don't forget to pin this for later!

The Ultimate Homemade DIY Deodorant List. A collection of deodorant and antiperspirants from green and environmentally friendly bloggers. Made with natural ingredients.

Jul 10, 2017

The Ultimate Homemade Toothpaste List


homemade and DIY toothpaste recipes


Tempted to try homemade toothpaste, but aren't sure how to go about it? Well you are in luck!


You may recall my experience making homemade toothpaste and Hubby exclaiming, "I don't love the earth this much!" Needless to say my first endeavor in homemade toothpaste did not go over well. I ended up using the whole container, and I didn't think it was that bad. Unfortunately I think the scoop Hubby got wasn't as mixed up as it could have been.

You don't need to worry about that happening to you though! I reached out to some of my favorite bloggers and asked them for their favorite homemade toothpaste recipes. So now we have 10 fantastic homemade toothpaste recipes to choose from. 

Amazon links are affiliate links. If you purchase using the link I may receive a 
commission, but your price is unchanged! Thank you for supporting the blog!


diy-toothpaste
DIY Toothpaste Recipe - Mama Instincts

Join the Skip The Bag weekly newsletter for more tips and ideas

* indicates required

How to make dentist approved toothpowder with www.goingzerowaste.com
Dentist Approved Tooth Powder - Going Zero Waste


Homemade Clay and Thieves Toothpaste--MeasuringFlower.com

Pin this for future reference! More recipes below.


Homemade Peppermint Toothpaste

Natural 3 Ingredient Homemade Toothpaste Recipe

An easy organic peppermint and coconut oil toothpaste your whole family will love.  Click to visit the ButterForAll blog and get the recipe.

Orange Peppermint Homemade Toothpaste | DIY Beauty | Non Toxic | Healthy Living


Still aren't sure if  homemade toothpaste is your thing? Here are some alternatives you can purchase. 


Looking to make other homemade alternatives of everyday products. Check out my super simple homemade face powder recipe. It takes seconds to prepare and you probably already have all the ingredients! The best part? You can customize the color to match your skin tone!


If you want to read more about my failed attempt at making homemade toothpaste and see which recipe I used don't forget to click here. I didn't find it that bad, especially after it got mixed up better. 


What's your favorite toothpaste recipe?

Jan 13, 2017

Rolodex Calendar


I've been wanting to keep in better contact with people by sending birthday cards. However, I didn't have a good way of keeping track of birthdays and I felt like I always had to scrounge for addresses. I figured making a rolodex calendar would be a fun way of keeping them together. 

I took each of the alphabet cards and decorated them with a different month. I have a lot of scrapbook paper and other embelishments so I was able to whip these up simply. I write the person's name and birthdate on the card.  I can flip through the cards to quickly see whose birthdays are coming up and send them a card. 

Since we have so many military friends who move a lot I didn't want to write the address on the back of each card. So I made a family card to put in the back. For example I would have a card in the back that says "The Smith Family" and has their names and birthdates and address. Then each member of the Smith family would have their own card. 23 January Tommy Smith, 15 May Susan Smith. 


Calendar Rolodex January - June


Calendar Rolodex July - December

How do you keep track of birthdays or other special dates?

Shared on Pretty PintasticHome Matters, Healthy Happy Green and Natural PartyHomestead HopHomesteader HopWaste Less Wednesday

Dec 12, 2016

Easy DIY Christmas Card Wreath


I wanted a fun, festive way to display the Christmas cards we recieved. I found one that I liked here, that I decided to replicate. It was pretty easy to make and I had most of the components already.

What you need:


  • Clothes pins
  • Green Spray Paint
  • Red Pony Beads
  • Ribbon
  • Wire Clothes Hangar
  • Hot Glue Gun

Directions:


1. Spray paint the clothes pins green. I did it by laying them out on newspaper. The other article suggested clipping them to a box you don't care about. Honestly, it would have probably saved some time because I wouldn't have needed to flip the clothes pins and it might have been easier to spray the sides, but doing it my way wasn't that big of a deal.

2. Make the clothes hanger into a circle. This was probably the hardest part of the whole thing!I had to bend it out of it's hangar shape and then try to get it round.  Mine isn't perfectly round nor perfectly flat, but it gets the job done.

3. String the clothes pins and pony beads on the hangar alternating. It's a little hard to see the beads, so if I were to do it again I might experiment with doing two beads between clips. However up close you can still see the red quite well.

4. Attach the two ends of the hangar. The website that I was using as a guide recommended just lining up the ends and gluing the heck out of it. However Hubby had a great idea about bending the two ends to make hooks and then looping the hooks. This alone probably would have been enough to hold it together, but just to be sure, I gluded the hooks together. It also made it so I could fit another couple of safety pins on since I didn't have to rely solely on the glue.

5. Use ribbon to make a tie from it to hang from and a bow for decoration. I used some wire ribbon I had laying around that matches the red and green.

I love that it is festive empty, but when filled with cards from our friends and family it is really fun.


P.S. This card says "It's 80 degrees and sunny somehwere" "Oh yeah, that's here! Merry Christmas there." I got this card a while back to send to our friends living in the snowy Northeast. I think it's fitting because between Hawaii and Florida we haven't had a snowy winter in many years!

Oct 6, 2016

DIY Signpost: Where We've Lived


I've always seen people throughout their military careers have memories of the places they have been stationed. The most common of which are signs that say "Home Is Where The Navy Sends Us"  (or whichever branch) with smaller signs for each duty station below it. I had always been attracted to having one, but never really put forth the effort to get one. They always looked like something Hubby and I could easily make and weren't really worth spending the money for.

At our last duty station we did a painting party and one of the options was to make one of these signs. I was sorely tempted to get one, but I knew that Hubby was getting off of active duty so having a sign like that wasn't going to have as much meaning at the end of our career as it would to have one we built throughout our career.

However I saw a sign post at a friend's house where it pointed the direction of their friends and places they had been stationed and I knew that would be perfect for us! It would be a sign post alternative to those signs and we would have a sign pointing towards each of our homes and cities we've lived.

army navy coast guard air force

We made a list of what places we wanted represented, the direction of that city, how far it is and, since Hubby is a pilot, the identifier of the closest airport.  We purchased a piece of lumber for post and had some scrap 2x4 for the signs. We painted the signs in colors that we felt represent the city best. Usually that meant either the school colors or squadron colors of that time. The back has the airport identifier.

Once painting the signs and covering them with a sealant we screwed the signs into the post in the direction they are relative to our home in Pensacola. It was a little tricky making sure the angles were correct, but fortunately most of them would face the same general direction.

army airforce marine corps coast guard

I love the colorful reminder of all the places we have lived!

Looking for another project? Check out the washer necklaces that you can personalize to go with any outfit.


Pin for later:
Easy sign post to highlight places that are important to you.

Shared on  Waste Less Wednesday

Aug 22, 2016

DIY Upcycled Washer Necklaces


I feel like I never have enough of the 'right' necklaces. It either sits in the wrong spot, or is the wrong color. So I decided to make my own. Via Pinterest, I found a very intriguing idea from Scarletrevolution's Etsy: Washer necklaces. While I could have purchased her washer necklaces, I figured I could make some of my own. I would get washers, cover them with scrapbook paper using mod podge.

Any variety of washers can be used. So far I've only made the ones shown above. However I recently went to Lowe's and bought all of the ones shown below which have a variety of sizes, widths, and weight. It would be very easy to upcycle some old washers if you've got some hiding in the garage.


However if I have two contrasting colors or complementary colors hanging them like this would be fun!


These are incredibly easy to make. I simply found a washer and some scrapbook paper that I like. The site which inspired me used comics, so you can probably use any paper with a design or picture you like. I traced and cut the shape out of the paper and used mod podge to attach the paper to the washer. I had the matte mod podge, but I think a glossy one would be better and make them look better. Another option would be us use an enamel coating. The chain is one I took off an old necklace I had.

Right now the back of the necklace is still unfinished. Unfortunately the necklace likes to flip around some while wearing it so I would recommend covering the front and back.


So with a few minutes of time you can have the perfect necklace for any occasion!

Looking for more upcycles? Check out the headboard we made from an old door!


Pin for later:
DIY Upcycled Washer Necklaces

Shared on Waste Less Wednesdays

Aug 11, 2016

Serving Tray: Upcycled Picture Frame


It was my mom's birthday and I was a little stumped about what to get her. Then I remembered seeing how some people upcycled old picture frames into serving trays. My mom loves having people over and brightly colored decorations in her house. She has brightly colored dishes and shares my addiction to colorful napkins. I remembered seeing that people had used old picture frames to create serving trays and thought that would be perfect for her. So I went on a hunt to gather the supplies for a serving tray.


To make a serving tray the first thing you need is a sturdy picture frame, preferably wooden. Now you would think it would be easy to find a picture frame suitable for this purpose. And while there are tons of picture frames there are not as many which are a suitable size for a serving tray and those that are are not generally wooden.


I used this task as an excuse to explore some of the local thrift stores. (For some reason Pensacola has a TON of thrift stores, but unfortunately many of them just don't carry that great of things.). The first place I went to had some good options, that were just sitting out in front of the store. When I went in to inquire about them I discovered that the woman running the store had set them aside for herself and the place wasn't really a thrift store, but rather a thrift store sorting facility. Strike one. Then I went to two other stores also striking out before finding this frame. It was perfect. It was the correct size for a tray, it had a wooden frame, it had a wide enough frame to add handles and it was already white! Perfect with a bonus.

Now that I had the frame I had to find some handles. This, too, was more challenging than I had anticipated. Big box hardware stores have nearly an aisle dedicated to different handle options, there aren't very many that are pretty enough to be tray handles. I really wanted one that had glass on it, but neither of the places I went had them. I ended up going with a nickel plated cage handle that worked well enough. I marked holes on the frame using the handles as a guide and then used a drill for the holes. The holes on  one side weren't quite lined up, but the handle was forgiving and it still screwed in. Afterward, I realized that the screw heads were rounded so it made the tray not quite lay flat on the table. It also meant that there was a possibility for the screw to scratch the table. So I bought some felt stickers and placed them in the corners. They raised up the tray enough that there was no risk of the screws scratching the table.


Finally, I had to select the paper to go in the tray. The tray was shaped differently than the 12x12 paper I had selected. Since it was striped I had some added difficulty trying to make sure the paper lined up properly. However I was able to find some paper that complemented some of my fun napkins and would match my mom's dishes. If this were my tray I'd probably change out the paper for different seasons, but knowing my mom she'll probably just leave it these bright summery colors. I'm so pleased with how it turned out that I'm temped to make one for myself!


Looking for another upcycle? Check out these washer necklaces


Pin for later:

Aug 8, 2016

Homemade Toothpaste Fail

My attempt at making toothpaste did not go well.

After buying bamboo toothbrushes I was motivated to try and go a step further by making my own toothpaste. It probably seems a little out there for a normal person, but I kept seeing person after person making their own toothpaste or tooth powder. Seeing everyone else do it further motivated me to give it a try.

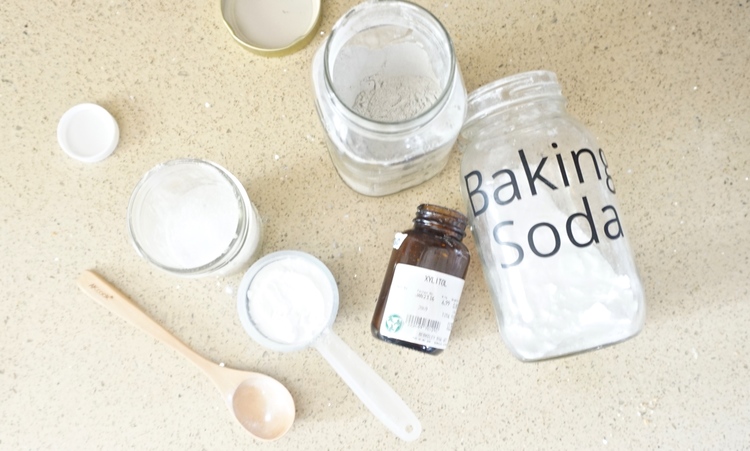
Now there are several different recipes out there with different ingredients. Some use xylitol or stevia. Others use bentonite clay or glycerine. I decided to start out with the simplest one I could find and one that I had all the ingredients on hand.

Homemade Toothpaste Recipe

2 T baking soda
2 T coconut oil
10 ish drops of Mint Extract *Other recipes use peppermint essential oil, but I was using what I had.


Mix them all together and you are ready to go. If you don't live in a hot humid place like me, your coconut oil may be solid. Warm it up in a water bath to make it a liquid. I can't comment on the consistency after it is mixed together because almost the only time I have seen coconut oil as a solid was when I was visiting home in Oregon and I saw it in my bag and it took me a minute to realize what it was. Between living in Florida and Hawaii the past 5 years temps rarely get down below coconut oil's melting temp. I'm guessing it truly is more of a paste.

You then wet your toothbrush dunk it in the toothpaste (most people probably scoop cause it's more solid) and brush as normal.

Pin for later:
My attempt to make own toothpaste did not turn out well.

Except it tastes awful. Hubby has done it twice. The first time it wasn't mixed up very much so he basically was brushing with coconut oil and said, "this isn't so bad." The second time he got it with baking soda and he asked, "Why are we doing this?" and exclaimed "I don't like the earth this much!" To say he isn't a fan is probably a bit of an understatement.

I have been forcing myself using it for the better part of a week and I'll admit I'm not much of a fan either. It just tastes so salty even trying to avoid my tongue. I have found more tolerable using less of it. So be sure to only get a little bit on your brush. Also rinse your mouth very well afterward (I probably don't have to remind you of this) and know it won't leave your mouth with a minty fresh taste. My teeth do feel clean afterward; it does a good job of scrubbing them clean, but the taste is taking some getting used to.

Update: Here is a collection of the best homemade toothpaste recipes!


So I will be testing out some zero waste toothpaste alternatives in the future, especially if I want Hubby to get on board! Have you had a positive experience using homemade or zero waste toothpaste?


Jun 27, 2016

Pickled Jalapenos


The most prolific item in our garden has been our jalapeno plant. It's great because we are actually growing something that has been thriving, but I unfortunately don't like things that are too spicy. Hubby prefers things far hotter than I do, and frankly I wouldn't have gotten the plant to begin with. However I don't want to berate our top performer. We had so many that Hubby decided he wanted to pickle them. We used the recipe from . I highly recommend the tutorial. It looks great and the recipe is easy to follow.
Simply Scratch


One of the nice things about the tutorial is you can make it for as many peppers you have. So we gathered up the peppers and the other ingredients: kosher salt, sugar, garlic, water and distilled white vinegar. The pictures with vinegar were blurry. :(


You boil up the ingredients while you cut up the jalapenos. 

Add the jalapenos to the boiling liquid, let sit with the heat off for about 10 minutes to slightly cook/soften the jalapenos. Then place them in the jar and when cooled put them in the refrigerator. The next day Hubby started eating them and he really enjoyed them.  I can't comment on how it tastes, because I am pretty wimpy when it comes to spicy food. 


Shared on Share the Wealth SundayMy 2 Favorite , Healthy Happy Green Natural