Showing posts with label Upcycle. Show all posts

Oct 6, 2016

DIY Signpost: Where We've Lived


I've always seen people throughout their military careers have memories of the places they have been stationed. The most common of which are signs that say "Home Is Where The Navy Sends Us"  (or whichever branch) with smaller signs for each duty station below it. I had always been attracted to having one, but never really put forth the effort to get one. They always looked like something Hubby and I could easily make and weren't really worth spending the money for.

At our last duty station we did a painting party and one of the options was to make one of these signs. I was sorely tempted to get one, but I knew that Hubby was getting off of active duty so having a sign like that wasn't going to have as much meaning at the end of our career as it would to have one we built throughout our career.

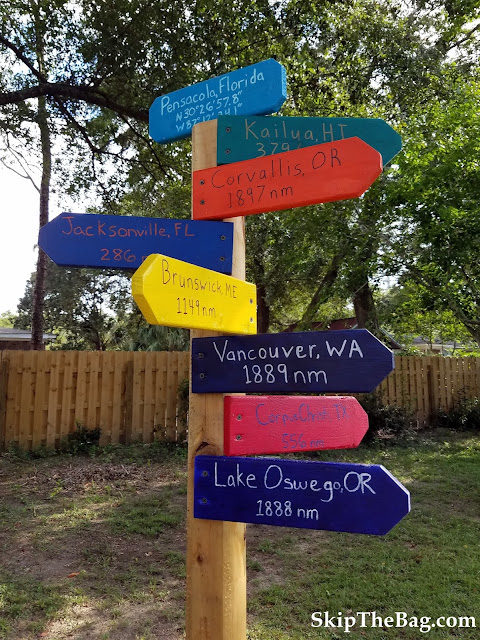
However I saw a sign post at a friend's house where it pointed the direction of their friends and places they had been stationed and I knew that would be perfect for us! It would be a sign post alternative to those signs and we would have a sign pointing towards each of our homes and cities we've lived.

army navy coast guard air force

We made a list of what places we wanted represented, the direction of that city, how far it is and, since Hubby is a pilot, the identifier of the closest airport.  We purchased a piece of lumber for post and had some scrap 2x4 for the signs. We painted the signs in colors that we felt represent the city best. Usually that meant either the school colors or squadron colors of that time. The back has the airport identifier.

Once painting the signs and covering them with a sealant we screwed the signs into the post in the direction they are relative to our home in Pensacola. It was a little tricky making sure the angles were correct, but fortunately most of them would face the same general direction.

army airforce marine corps coast guard

I love the colorful reminder of all the places we have lived!

Looking for another project? Check out the washer necklaces that you can personalize to go with any outfit.


Pin for later:
Easy sign post to highlight places that are important to you.

Shared on  Waste Less Wednesday

Sep 15, 2016

Precycling, Recycling, Downcycling, and Upcycling


I recently read the book called: The Zero-Waste Lifestyle: Live Well by Throwing Away Less* by Amy Korst. It was written by a woman who decided to go waste free for a year and it has information on why you should want to go waste free, tips on how to reduce your waste, and information on how you can make help make an impact on a global level by getting lobbying for corporate changes with respect to waste.

The book introduced me to a couple of concepts I hadn't heard before: precycling and downcycling. So I wanted to discuss what those are and see how they relate to two other concepts I am familiar with: recycling and upcycling.

Precycling


Korst defines precycling is the act of considering a product's worth, usefulness and recyclabilty before it is ever purchased. However she expands the definition further than I would. Her definition includes determining if a purchase is a need or a want, and limiting purchases that are wants. 

I would argue that determining if a given item is a need or a want would actually fall under the Zero Waste Tenet of Refuse, and that precycling is limited to weighing purchases based on their end life.

For example I have been making apple pie refrigerator oats for my breakfasts lately. It uses applesauce and my preference to purchase applesauce in glass containers over plastic is an example of precycling. Whereas purchasing whole apples and making the applesauce myself would be an example of refusing waste.

Recycling


Recycing, as adapted from Wikipedia, is the process of converting waste materials into reusable objects to prevent waste and reduce consumption of fresh materials. I like this definition because it addresses the two reasons why we recycle.

First, we recycle as a way to dispose of products we no longer have a use for. Junk mail, empty milk jugs, and cardboard boxes can all be recycled rather than sent to a landfill. Now the particular items which can be recycled varies widely by location, but in general every item sent to recycling is another item not sent to a landfill.

Second, this definition encompasses a reduced need for new raw materials when items are recycled. Paper and glass sent for recycling means that much fewer paper or glass needs to be created. It can save energy and natural resources, but recycling itself is not without energy expenditure and pollution. Therefore it should be seen more as a last resort and not a cure for consumption.

Downcycling


Downcycling is another concept introduced to me by Korst. She says some objects can be recycled over and over again into the same product without any loss of integrity. However, other objects cannot be made into the same product or can only be made into the same product a limited number of times. When the object cannot be remade into the same product, it is said to be downcycled. 

Glass and metal are products that can be recycled a near infinite amount of times. But paper and plastic are eventually downcycled. Paper is is made of fibers, as it is recycled, the fibers get shortened meaning that it can only be turned into thinner and thinner pieces of paper (think printer paper to tissue paper). Eventually it cannot be recycled anymore. Similarly plastic can usually only be downcycled. An example Korst gives is that the yogurt container is turned into plastic lumber. However she goes on to say, "Humanity can use only so many plastic benches."

Upcyling


Upcycling is generally a fancier way of saying reusing or repurposing. It gives an item that would normally be destined for the trash, or even the recycling bin, another chance to be useful. Some examples of upcycling are turning picture frames into serving trays, taking metal washers and turning them into necklaces, turning an old door into a headboard, collecting bits of plastic trash and turn them into beautiful sculptures or even embellishing some old clothing to make them attractive and wearable. 

All four of these have their part in reducing waste. Precycling when examining what objects you are going to bring into your house. Upcycling to see if you can eek out some more usefulness out of the object. And lastly recycling and downcycling to preserve resources.

Which of these do you do?

*This is an affiliate link, read my Disclosures and Privacy Statement.
Pin for later:


Aug 22, 2016

DIY Upcycled Washer Necklaces


I feel like I never have enough of the 'right' necklaces. It either sits in the wrong spot, or is the wrong color. So I decided to make my own. Via Pinterest, I found a very intriguing idea from Scarletrevolution's Etsy: Washer necklaces. While I could have purchased her washer necklaces, I figured I could make some of my own. I would get washers, cover them with scrapbook paper using mod podge.

Any variety of washers can be used. So far I've only made the ones shown above. However I recently went to Lowe's and bought all of the ones shown below which have a variety of sizes, widths, and weight. It would be very easy to upcycle some old washers if you've got some hiding in the garage.


However if I have two contrasting colors or complementary colors hanging them like this would be fun!


These are incredibly easy to make. I simply found a washer and some scrapbook paper that I like. The site which inspired me used comics, so you can probably use any paper with a design or picture you like. I traced and cut the shape out of the paper and used mod podge to attach the paper to the washer. I had the matte mod podge, but I think a glossy one would be better and make them look better. Another option would be us use an enamel coating. The chain is one I took off an old necklace I had.

Right now the back of the necklace is still unfinished. Unfortunately the necklace likes to flip around some while wearing it so I would recommend covering the front and back.


So with a few minutes of time you can have the perfect necklace for any occasion!

Looking for more upcycles? Check out the headboard we made from an old door!


Pin for later:
DIY Upcycled Washer Necklaces

Shared on Waste Less Wednesdays

Aug 11, 2016

Serving Tray: Upcycled Picture Frame


It was my mom's birthday and I was a little stumped about what to get her. Then I remembered seeing how some people upcycled old picture frames into serving trays. My mom loves having people over and brightly colored decorations in her house. She has brightly colored dishes and shares my addiction to colorful napkins. I remembered seeing that people had used old picture frames to create serving trays and thought that would be perfect for her. So I went on a hunt to gather the supplies for a serving tray.


To make a serving tray the first thing you need is a sturdy picture frame, preferably wooden. Now you would think it would be easy to find a picture frame suitable for this purpose. And while there are tons of picture frames there are not as many which are a suitable size for a serving tray and those that are are not generally wooden.


I used this task as an excuse to explore some of the local thrift stores. (For some reason Pensacola has a TON of thrift stores, but unfortunately many of them just don't carry that great of things.). The first place I went to had some good options, that were just sitting out in front of the store. When I went in to inquire about them I discovered that the woman running the store had set them aside for herself and the place wasn't really a thrift store, but rather a thrift store sorting facility. Strike one. Then I went to two other stores also striking out before finding this frame. It was perfect. It was the correct size for a tray, it had a wooden frame, it had a wide enough frame to add handles and it was already white! Perfect with a bonus.

Now that I had the frame I had to find some handles. This, too, was more challenging than I had anticipated. Big box hardware stores have nearly an aisle dedicated to different handle options, there aren't very many that are pretty enough to be tray handles. I really wanted one that had glass on it, but neither of the places I went had them. I ended up going with a nickel plated cage handle that worked well enough. I marked holes on the frame using the handles as a guide and then used a drill for the holes. The holes on  one side weren't quite lined up, but the handle was forgiving and it still screwed in. Afterward, I realized that the screw heads were rounded so it made the tray not quite lay flat on the table. It also meant that there was a possibility for the screw to scratch the table. So I bought some felt stickers and placed them in the corners. They raised up the tray enough that there was no risk of the screws scratching the table.


Finally, I had to select the paper to go in the tray. The tray was shaped differently than the 12x12 paper I had selected. Since it was striped I had some added difficulty trying to make sure the paper lined up properly. However I was able to find some paper that complemented some of my fun napkins and would match my mom's dishes. If this were my tray I'd probably change out the paper for different seasons, but knowing my mom she'll probably just leave it these bright summery colors. I'm so pleased with how it turned out that I'm temped to make one for myself!


Looking for another upcycle? Check out these washer necklaces


Pin for later:

Jun 23, 2016

DIY Door Headboard


I knew I wanted a beach theme in our guest bedroom in Florida, so I scoured Pinterest for ideas. I knew I wanted a lot of different pillows on the bed that had beach theme. Years ago Hubby made a bed frame for our guest bed, but we never had a headboard. As I was looking for ideas for the room and different kinds of headboards I saw several tutorials discussing headboards made from old doors. I showed Hubby the idea and we were off to look at old doors!

We first went to a local antique/resale shop. They had the perfect door I wanted, It was white, aged, and had a symetrical design along the entire door. Unfortunately the door was slated to be turned into a table so the guy wouldn't sell it. There was another door there, but they wanted $90 for it and I just didn't like it as much. So we went to the Habitat for Humanity ReStore next. For those of you who don't know Habitat for Humanity is a non-profit that builds houses. Their ReStores sell used building supplies and housing parts to help fund their builds. Seriously, they have tons of stuff! Sometimes they don't have anything of interest, but they are always getting new stock . They have cabinets, doors, lighting and bath fixtures, couches, paintings, paint and more. I could tell there was a local hotel that must have just gone through a renovation and donated the old items because there were nearly 30 identical light fixtures and paintings.  We went to their door section and they had a huge selection. There weren't any exactly like what I was looking at the antique store, but there were several options. We ended up selected a solid door that probably was an old pantry door. It was $10!


Hubby also picked up two 2x4 pieces of lumber from ReStore and we were ready for the project. We measured the height of the mattress and had the bottom of the headboard match up a couple inches below the mattress. We braced it with a piece across the back, and then attached it directly to the bed frame.

So I got a great, sustainable headboard for less than $20! I thought about painting it white, but I sort of like the color it adds.


We also hung up some pictures/postcards I had gotten of our favorite spots from when we lived in Hawai'i. These frames have been with us a long time. We purchased them as black frames to hold black and white photos we took from our travels. Those pictures didn't really fit in this house so I spray painted them white and put our beach photos in them. We've got Hanauma Bay, the Ko'olau mountains, the Mokuluas (the Mokes) twice for good measure, Diamond Head, a swiming honu (turtle) and Chinamans' Hat. 


Looking for other DIY projects? Check out the tribute we made to the places we've lived, but could easily be adapted for your favorite vacation spots. 


Pin for later:
DIY Door Headboard