Showing posts with label Food. Show all posts

Mar 27, 2017

Green Beer for St. Patrick's Day


I was at a friend's house for St. Patrick's day and they had green beer, and it was delicious! I quickly had to find out what it was. Well low and behold it is the SIMPLEST thing in the whole world to make. I may or may not have had another couple of green beers this week. It was, uh, research. The sacrifices we make.

The blue curacao turns green when mixed with a lager and gives it an orange flavor. It reminds me of a blue moon. In fact, I'd be curious to make this drink with blue moon.


Green Beer: blue curacao and light beer

12 oz light beer
1 teaspoon to 1 shot blue curacao (for color and flavor)


Amount of curacao changes the color
1 teaspoon of blue curacao on the left and 4 teaspoons on the right


Affiliate Links, see privacy and disclosure
Pin for later!

Mar 10, 2017

Roasted Red Pepper Baba Ganoush

Eggplant dip

Just the thought of red pepper baba ganoush brings me back Hawaii. I was first introduced to baba ganoush at my dearest friend's house who I met in Hawaii. There were many a night spent laughing and talking in my friend's kitchen scooping up baba ganoush with a glass of wine in my hand and my goddaughter under foot. So when I had the opportunity to recreate this dish all on my own I had to try it.

Hubby and I bought the eggplant to make ratatouille. A fun change of pace as we normally make eggplant parmesan. We didn't use all of the eggplant so we saved the remainder with plans of making baba ganoush.

It was so easy to make and turned out deliciously! First you cook the eggplant and red bell pepper. In Hawaii my friend would make it on the grill. I didn't want to hassle with that so I decided to broil mine in the oven. Every five minutes or so I would stir the vegetables around to make sure that they all got cooked and none of them got too burnt roasted. At this point you can remove the skins if you'd like. I didn't and it turned out fine. Even recipes that recommend taking off the skins say you can leave some on for flavor and color.


It took about 25 minutes for them all to get cooked. Then I put them in the food processor with olive oil, lemon juice, and garlic until blended until mostly smooth. Then it was ready to eat with some bread, crackers, vegetables, or whatever you'd like to dip in it.

Pin for later:


Roasted Red Pepper Baba Ganoush

Makes roughly 2.5 cups

2 cups eggplant
1 red bell pepper
olive oil, 4 tablespoons divided, more or less to taste
salt, 1/4 teaspoon, more or less to taste
1/2 lemon juiced
2 cloves garlic

Cube the eggplant and bell pepper. Coat in about 2 tablespoons olive oil and place on cookie sheet. Broil on high for about 20 minutes or until cooked. Take care to stir frequently to prevent burning. Some charing is ok for flavor, but you don't want it burnt.

Place in food processor and add additional olive oil, salt, lemon juice, and garlic. Blend until mostly smooth. Serve as a dip with bread, crackers, or vegetables.

Looking for other ways to use eggplant?
Read here for Hubby's eggplant Parmesan recipe plus tips for how to harvest eggplant in your garden.


Or do you want to make some tasty sauerkraut?

Shared on Home MattersPretty PintasticShare The WealthHomesteader HopHomestead HopHealthy Happy Green Natural Hop

Feb 13, 2017

When The Urge Strikes: No-Bake Peanut Butter Oatmeal Cookies


Ever have one of those days when you just want to make cookies? Well I have them all the time, but thankfully I rarely do anything about that urge. I'm pretty sure it would mean I would only eat cookies. Well yesterday was different; I wanted to actually make them (it would help with my green resolutions!). But I didn't want to go to the store it was raining and I'm lazy.

Chocolate chip cookies? No chips. No cookie mix-ins at all, actually. Oatmeal cookies? I had some oatmeal from my recent trip to the bulk store, but I didn't have any raisins (and you can't have oatmeal cookies without raisins!). Peanut butter cookies cookies? I'm hesitant, because I don't always love the taste of peanut butter.  

But wait! Surely there would be a recipe that would combine oatmeal and peanut butter, that would be delicious! So I took to the internet and found this delicious recipe. It was no-bake to boot, which means I could start enjoying the cookies that much sooner.

And enjoy them I have. I'll fully admit that I ate my fair share of these over the past two days. So if you don't have plans to share it with a group of people, I suggest a half batch...or a quarter batch, because you WILL be tempted to eat them all. Although they are probably healthy since they are made with oatmeal and peanut butter. 

Ingredients:
1- 1/2 cup white sugar
6 tablespoons butter
1/3 cup milk
1/4 teaspoon vanilla extract
3/4 cup peanut butter
2- 1/4 cup quick cooking oats

Makes 24 cookies

In a large saucepan over medium heat combine sugar, butter and milk. Bring to a rapid boil and boil for one full minute. 
Butter sugar milk mixture first step for cookies

Remove from heat and stir in vanilla and peanut butter. Mix in the oats, stirring until the mixture begins to cool. Drop batter by teaspoonfuls onto a cookie sheet, waxed paper, parchment paper, or aluminum foil. Let cool until set.


Then try not to eat them all in one sitting. Do you ever get cookie cravings?


Feb 6, 2017

Homemade Soft Pretzels


One of my New Year's Resolutions is to make a food product each month. So for January while my sister-in-law was visiting we decided to tackle pretzels. She had made them before, but I never had. We ended up trying two different pretzel recipes to try and get it right! The first ones we made didn't use yeast (because I didn't have any on hand) and they ended up tasting more like biscuits than pretzels. It was a good learning attempt on how to roll and make the pretzels, but we knew we wanted to tackle it again.

So a few days later we went out, got some yeast, and tried again. This time we were far more successful using Allrecipe's Buttery Soft Pretzels. Oddly enough the recipe doesn't use butter, but I guess that can be a technicality.

This site uses affiliate links. If you click on a link and make a purchase I may receive a 
commission used to help fund the blog. The price to you remains unchanged. 


Gather the ingredients:

2 tablespoons active dry yeast
1/2 teaspoon white sugar
3/4 cup warm water (~110 degrees F)
2 1/2 cups all purpose flour
1/4 cup white sugar
3/4 teaspoon salt
1/2 tablespoon vegetable oil
1/2 cup baking soda
4 cups hot water
1/8 cup kosher salt for topping


Makes 6 pretzels

In a small bowl, dissolve yeast and 1/2 teaspoon sugar in 3/4 cup warm water. Let stand until creamy, about 10 minutes.


In a large bowl mix the flour, sugar, and salt. Make a well in the center; add the oil and yeast mixture. Mix and form into a dough. If the mixture is dry add 1-2 more tablespoons of water. Knead the dough until smooth, about 7-8 minutes.


Lightly oil a large bowl, place the dough in the bowl and turn to coat with oil. Cover with a reusable napkin or towel and let rise in a warm place until doubled in size, about 1 hour.

Preheat to 450, grease baking sheets.

When risen, turn dough out onto a lightly floured surface and divide into 6 equal pieces.

Roll each piece into a rope and twist into a pretzel shape. This will be the most difficult part. I found it helpful to act like you are folding it in half, then switch the ends as you bring it back to the center. Don't worry, they taste the same even if they don't look perfect.


In a large bowl dissolve baking soda in 3 cups hot water. Make sure the water is really hot, not quite boiling. Once all of the dough is shaped, dip each pretzel into the baking soda-hot water solution and place pretzels on baking sheets. Sprinkle with kosher salt. Bake in preheated over until browned, about 8 minutes.


Some thoughts: I would make sure that the water is really hot. The original recipe has you dissolve the baking soda into the hot water and then form the pretzels. This made our water not be very warm and it didn't harden the outsides as much as I would have liked.

These were yummy, and I think with tweak I suggested they will be amazing. But if you have a perfect pretzel recipe let me know!

Dec 2, 2016

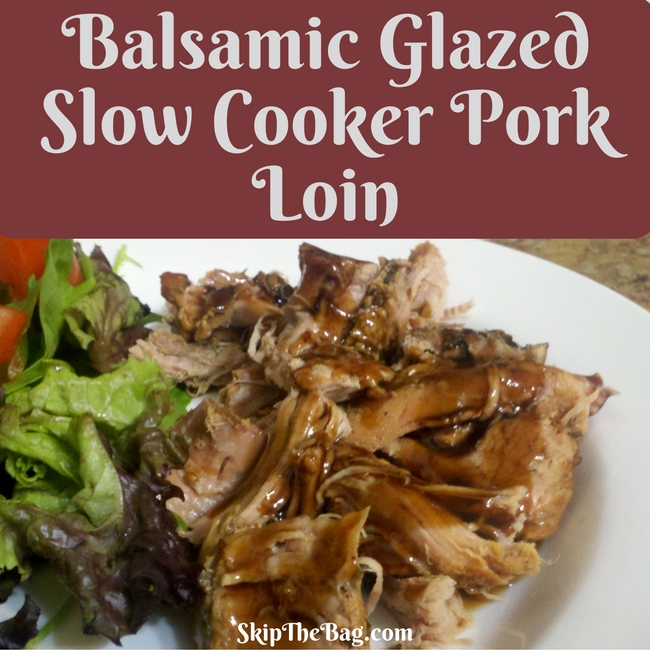
Slow Cooker Balsamic Glaze Pork Loin

Slow Cooker Balsamic Glaze Pork Loin

Have you heard of Pinterest failures or Pinfails? I'm not sure how popular they are now, but when Pinterest was first hitting its heyday Pinterest failures were more popular too. For those who are not aware they are when people try to replicate what they find on Pinterest and fail miserably. Some of them turn out quite humorously.

Thankfully I haven't made any total failures when trying to replicate a pin. Generally I'm quite pleasantly surprised with how things turn out. This Pinterest copy cat is no different.

Don't forget to pin this recipe to make later!
Slow Cooker Balsamic Glaze Pork Loin. Delicious crock pot meal that is easy to make.
This site uses affiliate links to keep the blog running. If you click on a 
link I may get a commission, but the price is the same to you.

You can see I served the balsamic glazed pork loin with some salad. It was amazing, better than I expected.

Serves 6-8

INGREDIENTS:


Pork:
2 pounds boneless pork tenderloin
1 teaspoon ground sage
1 teaspoon onion powder
1/2 teaspoon salt
1/2 teaspoon pepper
1 tablespoon minced garlic
1/2 cup water

Glaze:
1/2 cup brown sugar
1 Tablespoon cornstarch
1/4 cup balsamic vinegar
1/2 cup water
2 tablespoons soy sauce


DIRECTIONS:

In a small bowl, combine the sage, salt, pepper and garlic. Rub the spices all over the roast. Place the pork roast in the slow cooker and pour in the 1/2 cup water. Cover and cook on low for 6 to 8 hours. Near the end of the cooking time for the roast, combine the ingredients for the glaze in a small saucepan. Bring the mixture to a boil. Reduce the heat and let the mixture simmer, stirring occasionally until it thickens.

Remove the pork from the slow cooker, shred and place on a platter or plate. Drizzle the glaze over the pork and serve.


I only slightly adapted this recipe from Mel's Kitchen Cafe, so please give her the love.

Are you following me on Pinterest? Have you ever had a Pin fail?

Looking for more recipes? Check out Hubby's Famous Fish Tacos.


Oct 28, 2016

Just Eat It: A Food Waste Movie Review

Image result for just eat it

I stumbled upon the Just Eat It: A Food Waste Movie* the other night. It was very interesting! I was able to watch it for free on Amazon Prime. Try Amazon Prime 30-Day Free Trial*

First it followed a couple who had a goal of only living off of discarded food for 6 months. Their first donation was from their brother who was moving and needed to clear out his refrigerator. About a month into the experiment they started running out of staples and started getting nervous about how they would make meals. But they kept finding dumpsters after dumpsters full of food that hadn't met its expiration date yet. It was crazy to see how much food at a retail and wholesale level was literally being trashed.

Another part of the documentary had interviews with farmers and other people involved with food waste. It was so surprising to me to see how much waste was created from growers. They showed how a celery stock was harvested and cut down to make a heart of celery. Many of the outside stocks are trimmed to make sure it will fit in the plastic bag. So many stocks are trimmed that in a one square foot area the farmer estimated that there were 2 pounds of stocks, but that there was no market for the stray celery stalks that it wasn't worth the price of labor to pick them up.

In addition to the above examples of farm waste, the documentary introduced me to the idea of gleaning. Gleaning is where farmers allow volunteers to come in after the harvest to pick any remaining food typically to give to charity. Locally, there is a program called Society of St. Andrews. It is primarily focused in the South, however has some gleaning in some other states and is open to working in other parts of the nation. One of the pictures shows how 20,000 pounds of potatoes were collected from a Milton farm. I've signed up and hope that I'll be able to participate in a similar gleaning effort in the future.

Finally the movie showed the woman of the couple who was determined to live off of discarded food volunteer her time at Quest Grocery Store. That store, which is available in Canada is a bridge between a food pantry and a regular grocery store. All of the food in the store is donated from other stores. I was curious to see if there was a store like this locally and I couldn't find one. However I was able to find the Waste Not Want Not Jacksonville. This foundation is a group of volunteers which tries to connect food waste with those who need it. Jacksonville is about 5 hours away from Pensacola, so it's not really feasible to help volunteer with this group.

One change the couple made through this experience was to have a "use first" bin in their refrigerator. They would put leftover food or half onions or anything that needed to be used first. They would then make meals based around these items rather than creating more food and leftovers. I think this might be a good thing for Hubby and I to start doing. Occasionally I'll find a half of a tomato or onion that we didn't use because it got pushed to the back of the refrigerator.

I would recommend this movie if you are curious about food waste or want some motivation to tackle food waste. It made me want to see what local grocery stores are dumping!

*This is an affiliate link, read my disclosure here.
Shared on Simply Natural SaturdayHomesteader HopWaste Less Wednesday

Sep 5, 2016

Hubby's Famous Fish Tacos


We have a local fish market that is AMAZING! Just about any seafood you could want is available and ready for you to select. You can pick the size fillet you want, you can get the entire fish whole or dressed, you can even get some of the food steamed if you'd like.

We don't visit the fish market as often as we should, but when we do, we usually get at end up having fish at least 3 times or more that week. A while back we bought salmon, mahi, and basa, a type of catfish. We'd made plans to have fish tacos one night, Hubby makes them and they are delicious. However he went out of town and before risking the fish going bad, I tried my hands at them. They are very easy to make and taste delicious.


Ingredients:

1 fillet of white fish per person (I used basa this time, but we've used mahi in the past)
1 egg
1 cup of bread crumbs (I used panko crumbs)
Oil for pan frying
1/2 bag of preshredded coleslaw mix with carrots
3-4 T of poppy seed dressing
Taco sized flour tortillas
Avocado slices
Cilantro for garnish

The following are affiliate links, if you click and make a purchase I may receive a commission. Thanks!

Directions:

Cut the fish into small cubes or slices about 1 inch large, try to keep them consistent sizes. Heat oil over medium heat in plan. Dredge the fish in egg and then coat with bread crumbs. Place fish in oil and cook until bread crumbs are brown and fish is cooked, approximately 2-3 minutes on each side.

Prepare coleslaw mix by combining cabbage mixture and poppy seed dressing. Make the tacos by adding coleslaw, fish, avocado, cilantro to the tortilla. Feel free to add other items such as salsa. Then eat and enjoy!

This is the recipe Hubby has followed for years, but now that we have an eye toward waste I would make some slight changes. First, I would buy cabbage and make my own coleslaw rather than buying it in a bag. If I had some carrot or purple cabbage I'd shred some up, but I don't think the few shreds of carrot make or break the meal.

The next part, and the part I am having the hardest part finding an alternative to, is the poppy seed dressing. Typically we have purchased a bottle from the store and recycled the bottle. So I may have to do some experimenting to find a plastic free alternative.

Pin for later:
Easy, delicious fresh tasting fish tacos.

Shared on Waste Less Wednesday

Aug 29, 2016

When to Harvest Eggplant + Eggplant Parmesan Recipe

Tips for harvesting eggplants and a delicious recipe for Eggplant Parmesan.

When you first grow a garden there are many lessons that you learn. We already had to deal with a caterpillar and stink bug infestations and garden placement. I wouldn't have thought we'd have so many questions about when to harvest our plants.

We had some eggplant that we harvested earlier and it was delicious. Hubby made eggplant Parmesan with it and it was the best that we have ever made. So we were really excited for more eggplant.

At some point we had two of them that turned an orange color. We weren't sure what that meant. We kept wondering if it would turn back purple or what was going on. Well apparently eggplant turns orange once it is overripe and unfortunately tastes bitter.

harvest eggplant
Orange Eggplant- Overripe and Bitter
This site uses affiliate links. If you click on a link and make a purchase I 
may receive a commission, but the price to your remains unchanged. 

We learned that you cannot pick eggplant too early. When it is a good size and the skin is still shiny purple it is good to eat. If it starts getting dull, pick it quick. If it turns orange, you might as well pull it and start over.

Even though we lost those two, we thankfully had 3 others which we were able to pick and eat! Here is the recipe that Hubby uses to make his Eggplant Parmesan.

Pin for later:
Tips for harvesting eggplants and a delicious recipe for Eggplant Parmesan.


Hubby's Eggplant Parmesan Recipe

Eggplant, sliced
1 egg
1 cup breadcrumbs
salt, to taste
1/4 cup Parmesan cheese
olive oil, enough to coat the bottom of the pan to fry

Heat olive oil in pan
Slice the eggplant into 1/4 inch thick rounds
Mix the bread crumbs, salt and Parmesan together.
Coat the eggplant in egg and then the breadcrumb mixture
Fry in heated olive oil

Serve with pasta and marinara sauce.

Looking for another way to use eggplant? 
Try roasted red pepper baba ganoush! It is a delicious dip, which can be used similarly to hummus.


Or would you rather kick things up a bit and try some pickled jalapenos?


Shared on Home MattersWaste Less Wednesday,  Healthy, Happy, Green, Natural

Aug 18, 2016

Cheesy Quinoa Bake

Delicious quinoa, cheese and vegetable bake.

I've been making my way through some recipes I've found on Pinterest. I was attracted to this one called 'Cheesy Quinoa Mac and Cheese' because who doesn't love macaroni and cheese? And quinoa in anything makes it healthy, right? ;)

The original recipe had some comments saying it wasn't quite as cheesy or creamy as traditional macaroni and cheese, so a more appropriate name is Cheesy Baked Quinoa. Regardless of what it is called, it tastes good. As an added bonus the recipe is flexible so you can use up whatever vegetables you have on hand. Ingredient links are affiliate links.

Ingredients:

1 1/2 cup quinoa, cooked according to package directions
2 cups sauteed vegetables (we used broccoli)
2 cloves minced garlic
2 large eggs
1 pinch of salt
1 cup of milk
2 cups grated cheddar cheese (reserve 1/2 cup for top)
1/2 cup Parmesan cheese
Panko or regular bread crumbs for topping
Any other ingredients you think would be tasty or need to be used!

Directions:

1. Preheat oven to 350 degrees.
2. Sautee any vegetables you would like to use.
3. Mix eggs, milk, garlic, and salt in large bowl.
4. Fold in quinoa and vegetables and any other additives.
5. Place in greased 9" x13" pan. Top with remaining cheddar cheese and bread crumbs.
6. Cook until top is golden brown and cheese has melted, approximately 3 minutes.
7. Enjoy!

When we made it we only used 1 cup of frozen broccoli that we sauteed with seasoning salt. I wish we had added more so I increased it in the recipe above. Some other options for vegetables to use are bell pepper, spinach, zucchini, really anything!

Others really liked the 'crunch' of the panko bread crumbs, but I couldn't really notice them so I would be very liberal with it. I had only lightly covered the top of the dish with panko. Finally, we also had some tricolor couscous to use up so we replaced 1/2 cup of quinoa with the couscous. This doesn't change the flavor it was just something that I had to use up.

This was pretty good and I would make it again. Looking for another delicious recipe? Check out Hubby's Famous Fish Tacos.

Pin for later:
Shared on Waste Less WednesdaysHome Matters

Jul 12, 2016

Bacon Dill Cream Cheese with Puff Pastry Waffles Appetizer


While traveling we had a birthday party for a very special 3 year old. She wanted a totally pink birthday so we made a number of appetizers that had pink in them.

My favorite was the bacon dill cream cheese and puff pastry waffles appetizer. To make it 'pink' we served it with smoked salmon. Unfortunately I don't have any photos of it with the salmon (cause I was too busy eating it all!) So this recipe is just for the cream cheese and puff pastry waffles. This was incredibly easy to make and were a big hit!

First defrost puff pastry and cut it in half.

Next cook the puff pastry into a waffle iron. Cook until browned. It took us about 3 minutes. Slice the puff pastry into squares while it is still warm. As the pastry cools it gets very flaky and will not have crisp lines if you cut it after they cool. A pizza cutter worked extremely well for this.


In a bowl mix dill, bacon, cream cheese and salt and pepper to taste. Blend well.


Serve waffles with a knife to put on cream cheese and top. If you look hard you can see the plate of waffles and the bowl of cream cheese (next to the wine bottle) in the picture below. You can also see the red and yellow tomato slices and the blueberry goat cheese with figs. We've got a pretty special 3 year old that rates all this!


Bacon Dill Cream Cheese with Puff Pastry Waffles
one box puff pastry
one box cream cheese
3 tablespoons fresh dill
6 slices of bacon, cooked and diced.
salt and pepper to taste.

Defrost puff pastry sheets, cutting them in half.
Cook in a waffle iron until browned (about 3-4 minutes), Slice into squares.
Combine cream cheese, dill, bacon and salt and pepper in a bowl.
Serve waffles as crackers with cream cheese dip.

Posted on the Homesteader HopDucks 'n A RowFluster BusterSew Crafty AngelClassical HomemakingSustainable SundayMy 2 Favorite Things

Pin for later


Jun 27, 2016

Pickled Jalapenos


The most prolific item in our garden has been our jalapeno plant. It's great because we are actually growing something that has been thriving, but I unfortunately don't like things that are too spicy. Hubby prefers things far hotter than I do, and frankly I wouldn't have gotten the plant to begin with. However I don't want to berate our top performer. We had so many that Hubby decided he wanted to pickle them. We used the recipe from . I highly recommend the tutorial. It looks great and the recipe is easy to follow.
Simply Scratch


One of the nice things about the tutorial is you can make it for as many peppers you have. So we gathered up the peppers and the other ingredients: kosher salt, sugar, garlic, water and distilled white vinegar. The pictures with vinegar were blurry. :(


You boil up the ingredients while you cut up the jalapenos. 

Add the jalapenos to the boiling liquid, let sit with the heat off for about 10 minutes to slightly cook/soften the jalapenos. Then place them in the jar and when cooled put them in the refrigerator. The next day Hubby started eating them and he really enjoyed them.  I can't comment on how it tastes, because I am pretty wimpy when it comes to spicy food. 


Shared on Share the Wealth SundayMy 2 Favorite , Healthy Happy Green Natural